But How Good Is It? Samsung SyncMaster 2033HD

Bit of History
When I first got a desktop, I had a CRT (fat) monitor. Since then I have had an unbranded 15″ish silver plasma display, and a 17″ LG LCD TV. CRTs are now a thing of the past, the old monitor I had was fine, but had some terrible speakers built in either side. The LG Flatron M1721A is an okay TV. Built before HD was so common, I managed to get it cheap – £75 I believe, as there was a new Maplins opening in Kidderminster. It has speakers that are okay and ports on the back include ariel, VGA, scart and the 3 coloured component ports that old Xbox’s and PlayStations plug into (red white and yellow). I noticed after a while, a year or two, the reds that the tv displays, it displays them, then also copies them and displays them a short distance faintly from the original. Not sure why, and not too noticeable for most things, but sometimes you do see a red blur. It is currently in use connected to my Toshiba laptop, as I am home for Christmas – and it is doubling as a second screen.

Samsung 2033HD

Samsung SyncMaster 2033HD
On Amazon, I was looking for monitors and came across the Samsung 2033HD – a 20 inch widescreen monitor/tv with freeview built in and a whole host of ports on the back. It looked so good, my parents bought one too for their bedroom. They were priced at a very reasonable (must have been reduced) price of £120. This monitor/tv did not disappoint – it could do everything I wanted and more – I could connect my HDMI Xbox 360, my old Xbox with it’s component connection, my scart freeview box, my VGA pc etc etc.. it was so good, I wanted two.

But How Good Is It?
Very, with 720p HD (not quite 1080p), built in freeview – you just need an external antenna, dozens of ports and a pretty sleek design – I liked it. So what about the specs? Well it is a 20 inch LCD widescreen, with 16.7 million colours – which has to be enough for any domestic situation.. Speakers are in there, and to be fair are pretty good – I have played guitar hero on it, and not had a problem at all. It does sound better coming through my £15 logitech speakers, but only if you compare them consciously. 5ms response time seems to be as low as most other TVs out there, a TV remote is included, as is a stand, and the TV is wall-mountable if you buy a bracket.

Ports – in my opinion the most impressive part of this TV..

  • 2 x HDMI (1 on the side, under a little flap)
  • DVI-D
  • SCART
  • VGA
  • Component video input – RCA x 3
  • Audio line in – RCA x 2 (red and white from the yellow, red, white)
  • Audio line in – mini phone stereo (normal headphone jack it seems)
  • SPDIF – TOSLINK – fibre optic audio – never used this, probably never will
  • Another headphone jack on the side – very useful for connecting to speakers intermittently
  • Antenna in
  • Common interface – on the side – never used – something to do with DTV receivers.
  • USB port for servicing/firmware I believe. Don’t think you can use flash drives with it.. I’ll have to try..

Well that’s the list, the main ones are the 2 HDMIs for PC graphics cards / new laptops, VGA and DVI for PCs etc and the headphone jack on the side is useful too.

Montiors - old pc left, new pc right

Old pc CHKDSKing on the left, new pc installing Realplayer on the right

What’s in the box?
Included is:

  • Samsung 2033HD TV
  • Remote control
  • Stand (bottom bit)
  • VGA cable
  • Instructions

Overall
Overall a fantastic all-rounder TV, and good for the budget concious, they do occasionally seem to drop in price, keep your eyes on eBay. I loved mine so much, I bought another – exactly the same (although one seems to be a millimetre shorter or so). It makes the computing experience so much nicer having identical dual screens. I got the other one second hand off eBay, only quibble it has one dead pixel in the middle which is a little annoying (stuck on red), tried all I could to shift it, but nothing worked. I use a HDMI – HDMI and HDMI (TV end) to DVI-I cable to get from the TVs to my ATI HD6850 graphics card (outputs: HDMI, DVI, DVI, Display Port).
I am very happy with the pair of them, they look pretty cool, they have a blue glow in middle-bottom under the TV when it is on (pulsing if standby). They are made from black very glossy plastic, which gets dusty quick but does look good. One thing to bear in mind if buying twin monitors that are the same – they will BOTH respond to one remote control if it is pointed generally in their direction. I have had a few times where I go to turn the one off, and the other starts as well. I turn the awakened one off, and the other one comes on in reply.. can be prevented by putting the remote right next to their little sensor (bottom right dot on the plastic). No major hassle really. They also do have a fair few controls onboard the TV – along the right hand side (the little flat for the HDMI, headphone jack and CI is on the left), including power, vol up and down, source, programme up and down too I think. The main ones you use are source and power (bottom) though.

Quick Pros and Cons
Pros: Lots of ports, TV in built with freeview, HDMI, great quality, wide screen, big enough to have a document snapped left and right to each half (windows key and left / right arrow keys for Windows 7).
Cons: 1 dead pixel on one of mine, its a fairly unlikely event though, they take a couple of seconds(3-4) to fire up, which is a bit more than a normal pc monitor. I don’t think they are that adjustable – they tilt forwards and backwards I think, which is more than good enough for me – but I know e.g some dells can go up, down, forward, backward and even rotate..
If you want to see a video including this monitor starting up, click here.

Would I buy it again?
Yes, I’d buy two.
Matt

But How Good Is It? – Reviews

When buying new things, especially  technology, I take time – and lots of it. Why? Because I really like making informed decisions, and I want to know exactly what I am getting, what it will or will not do, will it work as I expected, and will it still do so a few months down the line?

Not much to ask normally, but it can be hard to find the a good bit of tech with the huge range of manufacturers and models out there. How many 20″ monitors are there? Thousands? Bound to be some rubbish ones and some “easter eggs” (amazing finds) in that mix.

So I write a few reviews of the things I have purchased – in the hope that it will allow someone to make a slightly more informed decision – as I try and put myself in the “user”s shoes – which is especially easy when I am a user. I will find out what annoys me about the product, could something be made better, and if there is something great about it. So comes the review set of blog posts about some of the tech I own, if its worth buying, crucially – would I buy it again?

First I am going to talk about a Samsung Display I have. But how good is it?

Lets Get Things In Order – Custom Post Order

As you may know if you use WordPress, newer blog posts are shown at the top of pages, and they push old posts further down. This is fine for someone blogging bits of news and interesting stories, but didn’t quite cut it for my posts on my computer build. I wanted users to be able to read from the beginning and see it being built up and progressing – rather than reading the posts backwards and seeing it being disassembled into components.

I also wanted just my “Build 2.0” category and other progression based topics to have this styling, not all of them. One idea I had was to make a webpage in HTML as a sort of contents or index of my build. This way I could order the links to each blog post in any way I wanted(using their permalink addresses). This doesn’t make it very readable, as users would have to open each link as a new tab for each tiny bit of the story, and also I would have to remember to grab the permalink for each new post and add it to the HTML page… “There’s gotta be a better way..”

After looking on the internet for some sort of “WordPress Organiser”, I found many people had searched for “WordPress Order”. Well ordering my posts – that was exactly what I wanted. It seemed the best plugin for the job was “Custom Post Order

Very easy to use, I installed by going wp-admin –> Plugins and searched and installed it from there.

To configure, go Settings –> Custom Post Order. From there you can tell your posts WHAT to order by (names, dates, titles etc), HOW to order (Ascending / Descending) and WHICH posts you would like it to apply to (specify categories or all)

Here are the options you get:

Order By


Order Direction

Apply To

You then see your list of categories (and sub categories!!) that you can check to apply it too.

Very useful plugin, did exactly what I wanted to :). If you want it too, search for “Custom Post Order” or go to their WordPress plugin page here.

Matt

Aber LINKS Website – IE Specific CSS Problems and Solution

During my testing of the site (I feel it is necessary to test extensively on many browsers, operating systems and screen sizes – to ensure no users are needlessly excluded), I found that Internet Explorer displayed the site wrong – the “main area” was displayed 5px or so too high, and it’s side borders were eating into the nav bar. Looked messy, unprofessional, and with the reality that a lot of companies may be reluctant to get away from the horrible old IE browser, I needed to do something to allow IE users to view  the site properly.

Why?

Why does IE display it wrong when Firefox, Chrome, Safari, Opera, Konqueror etc all display it perfectly happily?

After a small amount of research, I found it is because IE does not render the W3C box model correctly. (W3C – World Wide Web Consortium – the people that make the standards and protocols that everyone should adhere to.) So every other browser complies with (at least this part) of the W3C recommendation, but IE still does not, or at least the IE8 that I have and the ones before it don’t. I found the information on why it doesn’t render correctly here.

So what to do? IE isn’t quite sure about heights, widths, margins and padding etc, but every other browser is. I decided I needed to make the site display properly in IE, as although in my opinion it is a terrible browser, many people still use it (9.51% of people to the LINKS site currently use IE – but bear in mind this includes a lot of university students, who are likely to be using newer, better browsers on personal computers).

How to pick out IE users

After trying to redesign my CSS so that it would work happily in both IE and others, (basically changing the code so IE displayed it properly, but then finding the now wrong code obviously displayed incorrectly in every other browser), I decided that IE needed to be using some different code to all of the other browsers. I found it is actually very easy to pick out the IE users, and give them some different code by using “<!– [if IE]>” in your code. What is that? Basically the code is singling out IE users with the [if IE], but it is put in a comment so all other browsers ignore it.

This “if” is actually quite versatile, as you can specify certain IEs [if IE 6] or if it is earlier than a certain one [if lt IE7] (lt for less than, gt for greater than). You can also use [if !IE] – if it is not IE. I found out about this here.

Fixing CSS for IE

So with the “if” in place to catch IE users, I now give them their own stylesheet (style2ie.css). This overrides/overwrites the previously given styelsheet that is for all pages. Other browsers will see their correct CSS, and ignore the IE one in the commented “if” statement.

This IE stylesheet is exactly the same as the normal one except that I have added 5px of padding to the bottom of my nav bar, to force the main area down by 5px. It’s a bit of a hack, but it works fine for my purposes. At this time, it is also a good idea to add “a img {border: none; } ” to your code, to stop IE putting blue boxes around all the links that it sees. See the snippet of code from my main CSS below. SiteNavigation is the div around the navbar. It doesn’t matter if you have the “a img” part available in the main CSS – it doesn’t seem to affect the other browsers. It is just for IE.

Code for IE


Aber LINKS Website – PHP

I have used PHP on the Aber LINKS site to make the site more interactive and maintainable. The main use I have used it for at the moment is server side includes – where some common code across many pages is pulled from just one file. This means the code is written just once, and only has to be modified once to affect all pages. I also created a “template” page – with the headers, footers, nav bar, menu and main area all set out ready to receive content. This allows for easy page adding whilst keeping all pages consistent.

Adding a new page

How hard is it? It’s only as hard as you make it. Using PHP, it can be really easy and I follow the following steps with my site:

  1. Make a copy of my template page
  2. Add the content into the main area for the new page
  3. Update the menu and nav bar includes to include the link to the new page
  4. Upload the new page, and updated nav bar and menu.
As you  can see it is very easy to add a new page – as the layout is all done and ready for me. To modify the menu and nav bar across all pages, I have to modify just one file each.
What else to use PHP for?
Currently I also use PHP mail for the contact form. I learnt this code from W3Schools – click here for a link to their page on Secure E-mail with PHP. I have also found it is easy to add another recipient to the PHP mail, by just simply adding “,anotheremail@domain.com” (remember the comma) to the String of who the mail will be sent to.
We currently have no real use for an SQL database at the moment, however I would be ready to use one after doing this assignment.

[It is worth saying at this point, when I refer to Aber LINKS - I do mean Aberystwyth LINKS (St John Cymru - Wales First Aid Society at Aberystwyth University), just in case another place gets a LINKS unit (Aberdeen, Aberdovey etc) and calls themselves Aber LINKS. ]

Aber LINKS Website

Aber LINKS site

Recently I have been tasked with designing, building and maintaining a website for the St John LINKS First Aid society that I am a part of at university. A couple of weeks ago I started the XHTML and CSS code, using my old website as a base to design on.  The design of my old website has a container around the bulk of the page, with a “main area” in the centre – where the content for each page goes. For the LINKS website, I chose to design the page to be central and  relatively thin compared to my wide 20″ monitors. The main area is 600 px wide, and the content (that differs between pages) goes in here. The whole page is about 866px wide, and this displays fine on 10.1 inch netbook screens, without the user needing to scroll to see things. I work hard to ensure that the sites I build are easily and pleasurable to view on all screen sizes.

Above the main area, there is the horizontal navigation bar. Above that is the top header image of the site. To the left of the main area is a menu of all the pages, which isn’t vitally needed as I have a nav bar, but I prefer to let the user choose which to use – as they will naturally use whichever they are used to. Below the main area, there is a footer that contains the date and a Google +1 button. I have tried to add a Facebook like button, but placing it has proved very problematic. I will also possibly add a “Copyright Aber LINKS” at some point too.

Over the past few weeks, I have worked closely with the President and PR and Media Officer to perfect the site, and ensure that it complies with all the St John procedures – as we don’t want to be putting on pictures of things being done wrong. Also the difference between St John (England) and St John Cymru – Wales has became evident, as I am not aloud to use some of the nice “LINKS” logos that I found – as they are the English ones. Nothing can ever be simple, can it? But I have adjusted and adapted where needed, and nothing but the odd image look has suffered really.

Another progress post coming up..

Matt

Post Build – SSD Benchmark

Here is the benchmark for my OCZ Agility 3 120gb SSD from CrystalDiskMark.

Bear in mind the drive is rated at 525/500 Read/Write.

Just found on Amazon – Sequential Read/Write up to 195/130 MB/s, and as you can see, it slightly outperforms this.

Hard Drive Benchmarks - 209mb/s max read, 143 mb/s max writeTest on the Samsung drives coming up.

Post Build – FSX Temps

Just had a good go on Flight Simulator and tried to get some good temperature results when things are under a bit of load. Have a look at the table below for the temperature when playing FSX, the rough idle temperatures (min) and the maximum temperatures I achieved at some point.

FSX Temps

Flight Sim Planes

Lets Build – Finishing Up

The last (planned) part in this mini-series regarding the build – more may appear with further reviews or problems that I encounter if needed.

With everything assembled and working – I had a functioning computer! Windows 7 was installed, drivers were updated, some programs were on and all of the hardware seemed to be going fine, however I found myself opening up the convenient front door of the case, as well as smacking side panels off again.. but why?

8 Pin power extension

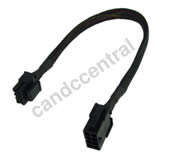
8 pin EPS12V 30cm cableBefore, my CPU 8 pin power cable went straight from the PSU, over the graphics card, and back down to the board – fairly untidy. I invested in a £4.68 8 pin EPS12V 30cm black extension cable. [I noticed you can get these in different colours from this seller, and different sizes elsewhere on eBay. Just make sure you don’t get a PCI-E one, also 8 pin]. I routed this around the back of the case by the rear exhaust fan, and over the top of the case to the port on the board. Looks much better.

SATA III (3) flat 6gbps cable I also purchased a SATA 3 locking 6gbps cable (45cm) for £2.24. This was due to needing a flat SATA3 connector for my SSD – as I was mounting it on the convenient mounting points on rubber feet located at the bottom of my Antec DF35 case. The 90 degree cables were unusable, as they tried to go out of the SSD and downwards – where the case was. Fitted this cable fine, the SSD didn’t mind it, and CrystalDiskMark showed the same read and write benchmark tests (I wanted to ensure it was a 6gbps cable!).

I also ordered a PS/2 to USB connector to try with my old keyboard – just to see if it would work. That still hasn’t come yet though.

SSD Performance

This PC boots extremely quickly compared to my old computers – although it does stay around the BIOS level a long time.

The above YouTube video is of my computer booting. When I press the power button, about a second later it turns on and activates the extension lead (the PC is the “master”) and this turns on all the “slave” ports which include the monitors, speakers etc. I timed 40.1 seconds from pushing the button to the desktop. I started Chrome and opened a website (my webmail) just to show that the internet was up and ready to go straight away. Off to Facebook in 40 seconds? Pretty good.

Macromedia Fireworks loads very quickly too – somewhere just under 1.8 seconds. The pc changes from Aero to Windows basic mode (fireworks, flight sim x etc need basic mode) almost instantaneously. Notepad++ starts in about half a second, Google Chrome starts as though it was minimized, and even Internet Explorer doesn’t freeze when it starts (not that I use it. Ever. Apart from when Hotmail forced me to use it :/ ).

Farming Simulator 2011

A game I particularly enjoy, old computer handled it very well. This one handles it perfectly with even better graphics. Rarely if ever lags, the only jolts are caused by me doing things like driving forage harvesters into solid guard rails..

Flight Simulator X

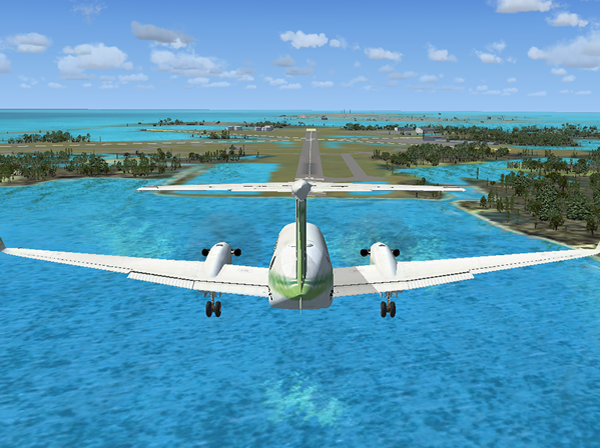
Flight Sim X - Approaching Key West (INTL?)I’d like to talk to you about Flight Simulator X – the latest Flight Sim at the time of writing (21/11/2011) – and my old computer with a beefy ATI HD6850 card would be able to handle it perfectly, I thought. I was half right – it ran it fine, but the settings were medium or low/medium to be on the safe side, to try and prevent lag and slow frame rates. I installed it to this computer (I chose to install it to the SSD – which has only 54 precious gb left free) – and fired it up to have a play. I plugged my Saitek joystick in, and luckily Windows 7 found the drivers and installed them quickly – I was notified by it’s success by my aeroplane suddenly throttling up as it began to rumble along the runway. After cleaning the dust out of my scarcely-used joystick, I took off the parking break and went for a fly. It was smooth – very smooth, and the scenery looked very good too. Once up in the air (I took off from the smaller Key West airport – Florida), I decided to check out the “Display” settings to see how high I could get them to go without it becoming laggy. To my amazement, the game had detected what hardware it was allowed to use, and had ramped every setting up to “Ultra High”. After a small flight, I turned on my second screen, and got another view (View – new view) of outside my aircraft and put that full screen on the second screen. So now the game was running 2 x 20″ inch HD screens of different Flight Sim windows, and it handled it perfectly! I touched down at the (International?) larger airport after seeing many building and even tankers docked by land. I am sure there is much more to explore with the new graphics, and I certainly will at some point. I ran Hardware Monitor and the temperatures were slightly raised, but still nowhere near hot. When I play again, I will get some figures for you.

Conclusion

Well I think that’s all for now, so I will pop a small conclusion here for anyone who doesn’t want to (and I don’t blame you) read the entire blog – as I am sure there are many thousands of words. I have tried to include as many pretty pictures as I can – not an amazingly easy feat with WordPress – but not bad. Adding that YouTube video was fine – when you upload, you get a link and a button to “Embed” (into a webpage). It will give you some small HTML code – just pop this into the HTML version of your blog (hit the HTML tag on the top right when writing a post).

So what did I do? – and some quick comments and ratings

I built a computer based around the Intel i7(10/10), with:

  • Asus P8Z68-V motherboard – pretty perfect – 9/10
  • CoolerMaster Hyper Evo cooler – quiet, slow, big – 10/10
  • 8gb of Corsair Vengeance RAM – looks good – 10/10 for my purposes
  • OCZ Agility 3 120gb SSD – annoying firmware, amazing device – 9/10
  • ATI HD6850 graphics card – great card, few outputs, 6 pin power – 9/10
  • Two 1tb Samsung Hard Disks - audible, take a few seconds to spin up – 8.5/10
  • OCZ 600w ModXStream PSU – good modular design, quality – 9/10
  • All encased in an Antec Dark Fleet DF 35 – many cool features, no USB 3.0, fans a little loud – 8.5/10

Some peripherals include:

  • Logitech MX518 Gaming Mouse – great mouse – 9/10
  • Logitech K200 keyboard – simple, standard, basic – 8/10
  • TP-Link TL-WN722N wifi adapter – fine wifi adapter – 9.5/10
  • Microsoft LifeCam webcam – good webcam, very sensitive microphone – 8.5/10
  • 2 Samsung 2033HD 20″ HD screens – great screens, many many inputs [Click to see review] – 9/10
  • Logitech X-140 desktop speakers – Good speakers, good adjustable bass, input and output on right one – 8.5/10

I am sure to write blog posts about some of these at some point – as I do take a very long time to choose what I buy, and am rarely disappointed with my purchases.

Going back to what I built – the PC runs Windows 7 Ultimate 64 bit – very good, the only real choice for computer enthusiasts (especially if you have over 4gb of RAM – you need 64 bit rather than 32 bit).

Why did you build?

My old PC was getting a bit slow and out of date with its dual core. I went for an i7 due to it’s immense power, and hopefully it will not need upgrading in the near future. I opted for a 120gb SSD as I have filled 65gb already, I wanted to put some programs on it – not just the OS. I will still have to install some programs to my spinning disks, though. My documents also live on the spinning drives too. 8 gb of RAM should be more than enough for my needs, and coupled with the awesome CPU and the great ATI HD6850, they make mince meat of any games. Going to try out Portal 2 soon.

Would you do it again?

The most important question, in my opinion – to someone having done it, would you do it again, and why?
Yes. I would build this again, were this one to spontaneously combust (it shouldn’t, don’t worry). Would I opt for the same components? Yes, probably – I’d maybe consider the Corsair Force 3 SSD a bit more, but would still go for the OCZ in the end. Also make sure you have a legit copy of Windows 7, they just feel safer. I’d love a bigger SSD – but they are so expensive, a 120gb will more than suffice.
Well just a note to say thanks very much for reading, please leave any comments and I will try and get back to them as soon as I can. Alternatively email me or click here.

Lets Build – Problems Encountered On Build

In the last post, I added in the graphics card and 2 hard drives from my old build. Windows 7 had been installed, as has Office 2010, Macromedia Fireworks, FileZilla, Realplayer, Notepad++ and also some diagnostic things like CPUID’s HWMonitor.

Major Problems Encountered

So far I had encountered a few major problems:

  • Whenever the computer booted, it would report “CPU FAN ERROR” – press F1 to continue. I first changed the option in the BIOS to tell it to carry on in the event of an error. I email scan and told them I had tried the CPU fan in all the headers, and it was still the same. After a few days, they replied asking me if I had put it in the CPU_FAN header, which it was already in. After a few attempts at contacting them again, they replied saying they thought it was the motherboard, and did I want them to send me another. Replacing the board would have meant starting right from the start again – rethermaling the CPU, fitting the cooler back on top of it, the RAM, updating the BIOS, probably re-installing Windows and all of the drivers.. at least I could have followed this blog if I got stuck. In the end I consulted with a friend who advised me to have a look at the BIOS settings again regarding the fan. I went in and changed the CPU LOW FAN SPEED from 600RPM to 200RPM. I believe this value means the value at which an error will be thrown if the CPU fan goes too slow, rather than setting the lowest fan speed – as you may imagine. The CPU fan seems to spin around 590 – 700RPM. With the new low value set – the error was gone, as the fan was spinning quicker than it’s warning value. (My fan spins slower than most CPU fans as it is a 120mm fan rather than an 82 or 90mm). The fan is quiet, the CPU is still cool, so it is good enough for me – and I am not going to try a new board.
  • All the issues with updaing the SSD firmware, see this blog post if you want to know how to hopefully avoid these issues, and my recommendations.
  • Blue screen on boot – when changing that SATA leads around, the BIOS decided that it would rather try and boot off the old Samsung drive with it’s old Windows 7 on it. The Asus EFI BIOS (simple version) only showed a little picture of my Samsung drive – so I had to go to the advanced options – boot and give them proper boot priorities as you would in a normal BIOS. Not really a problem – but worth watching out for.
  • Trying to update my Samsung drives with an OCZ firmware and breaking the Windows installation. I’d recommend completely disconnecting all non essential hard drives when playing around with updating firmware and Linux commands.